Many people can use the same PC, but each has its own user account. Here’s how to create user account in Windows 10.
If you share your PC or laptop with family members or colleagues, separate user profiles are the answer. These allow you to block software, files, and browsing history, as well as prevent others from cluttering your desktop with randomly downloaded items from the Internet. In addition, with child accounts, you can limit permissions so kids can not install apps and do other things.
It’s easy to set up additional user accounts in Windows 10, but if you have other computers running older versions.
How to create user account in Windows 10?
Ideally, the new user should already have a Microsoft account because it works better with the various Windows services integrated with the operating system. It’s not essential, though.
To get started, log in to your own account and go to Start > Settings > Accounts.
In the left column you will see different options, including Family and other users. Select this option and the main pane will show you the two types of accounts that can be created: Family and other users.
Family
As their name implies, family accounts are intended for a household and have special features that allow parents to define child profiles limiting access time and limiting the type of content accessible to younger people.
You can also add money to the account, which can then be spent on the Xbox Store or elsewhere.
Set up is a simple affair. Just click the Add Family Member button.
Then you can choose between an adult or child account. If your child does not have a Microsoft account, you must create one per click ‘ The person I want to add does not have an email address option (after checking ” Add a child “) that appears under the text box, and then clicking Next.
Microsoft tries its luck on the next screen where it asks permission to send targeted ads. Say no to that, so all you have to do is set the security settings for the child.
These can be viewed and modified at any time by visiting account.microsoft.com/family.
Of course, you do not need to create a child account because there is an Add Adult button. By clicking on it and entering a Microsoft e-mail address, you will create another full-fledged user who can manage requests from the junior accounts and change the associated settings.
To complete the process, click Confirm and Windows will send an invitation to the new user with the option to join your family.
Other users
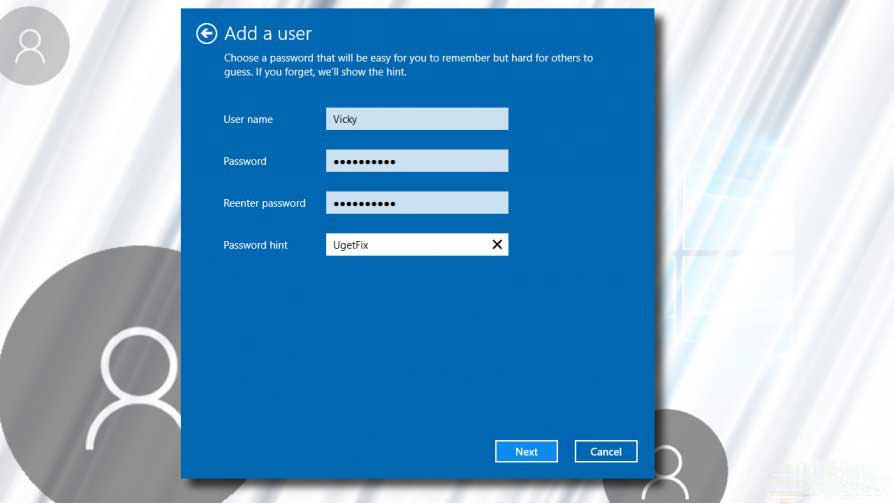
If you share the PC with a roommate or co-worker, you will want to use the Other People option. Click the Add someone else to this PC button, enter their Microsoft email address, click Next, and the account will be created.
If you want them to be administrators rather than standard users, you need to access the Start menu and search for Control Panel. Select this option and navigate to User Accounts> User Accounts> Manage Another Account, and click the new one you created.
On the next page, select Change Account Type, then click the Administrator option and complete the process by clicking the Change Account Type button.
Delete an account
To remove any User ID later, go to Settings > Accounts > Family and Other Users, click the account, and select the Remove option.