
More and more often you replace the hard disk of your PC, because it has stopped working perfectly, or more often to replace an old mechanical HD , with a faster SSD.
Cloning is very useful in these cases because it allows you to easily pass all the data from one hard disk to another so as to make the transition painless.
Clone a hard drive: guide with the best free programs
Cloning differs from simple backup, because in that case some files are copied, in case of cloning a complete byte-by-byte copy of the HD is created. In fact, cloning is the most complete backup that can be made of a mass memory. All system files will also be placed in cloning.
The easiest method to clone is to simply connect the new HD to which we want to copy data viaa USB SATA adapter. There are several excellent ones on Amazon:
Or an excellent solution can also be to choose a case that will allow you to clone and reuse the old HD disassembled and replaced to create a comfortable external drive.
There are various free programs that are excellent for cloning an HD. The best isClonezilla, an excellent program even if it is not very simple to use (we will see it further in the article).
If you are on Windows operating systems, you can use a much simpler tool likeAomei Backupper, a free program (freeware) that allows you to do everything through a few simple commands.
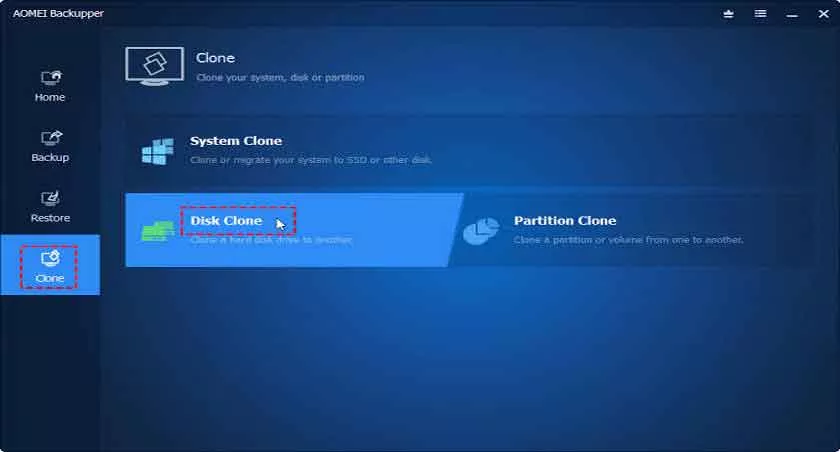
The cloning procedure of a hard disk with Aomei Backupper
For this part of the guide, we will use the basic version ofAomei Backupperwhich iscompletely free, at least for private users while for professional and business users it is paid.
To proceed, you must first download the program fromthis page, install it and launch it. The installation is very simple, in our language and does not present particular pitfalls, just double click on the downloaded executable to start the setup.
Once the application has started, you will need to go to theClonesection by clicking on the item of the same name, and then you can select theClone Discooption . At this point the procedure will start asking us which unit to copy and immediately after which unit we want to have our copy.
The target drive must have enough memory and must not contain important data for you. In fact, the data of the destination disk will be completely deleted and replaced by the new ones and will not be recoverable in any way. Normally if you clone to replace HD with an SSD, the latter is the target disk and is empty.
At this point you will only have to be patient and wait for the end of the data transfer. At the end of the transfer we will have two hard disks where exactly the same data will be present and therefore, if you want, you can proceed to the manual part of the replacement.
This is the quickest and most likely also the most practical method; if this tool does not satisfy you, a valid alternative is to useEaseUS Todo Backup, another convenient tool with a graphical interface, free for private individuals.
To try instead with Clonezilla, we invite you to consult the following paragraph.
Clone a Hard Disk with Clonezilla
It is a smallLinux distributionspecialized in hard disk cloning. It is undoubtedly a really powerful tool: it can be started onUEFIorBIOS, supports all filesystems (those of Windows, Mac, Linux, BSD and virtual machines), makes an integral copy even of the boot sectors, has a convenient tool to restore the bootloader, and the created copy image can be saved in the position you prefer (locally, on a connected USB drive, on FTP and Samba servers).
After this very short presentation, the time has come to see how tocreate a live USB stickand start Clonezilla on our machine. Here are the simple steps, you need to:
- Download the right image of Clonezilla,thisif your machine is UEFI,thisif based on BIOS;
- Download and start theRUFUStool ;
- Insert a USB stick that does not contain important data for you (it will be completely formatted);
- SelectMBR partition scheme;
- And click on ”Start”.
At this point you have to restart the PC leaving the key inserted, if based on UEFI a menu will ask what you want to do. If based on BIOS you will have to change the boot order, usually it is done by pressing theF10 keyand selecting the stick (the key varies according to the BIOS).