
System File Checker: Some Windows 10 function errors are caused by corrupted or even nonexistent system files. When this occurs, the user begins to notice unexpected system failures, such as problems when Windows starts , bugs during use and unusual computer actions.
Windows 10 Error: How to Fix it by System File Checker
These errors, in general, happen after failures in system, drive and even application updates. However, fixing these problems is simple and can be done using a few commands in the System File Checker. It is important to remember that to start the process, the computer must have Windows updated. Check below the step by step to find the flaws and fix them.
How to check for System File Checker failures
Step 1. Search for “command prompt” in your computer’s search bar. Then, right-click and run the application as an administrator;
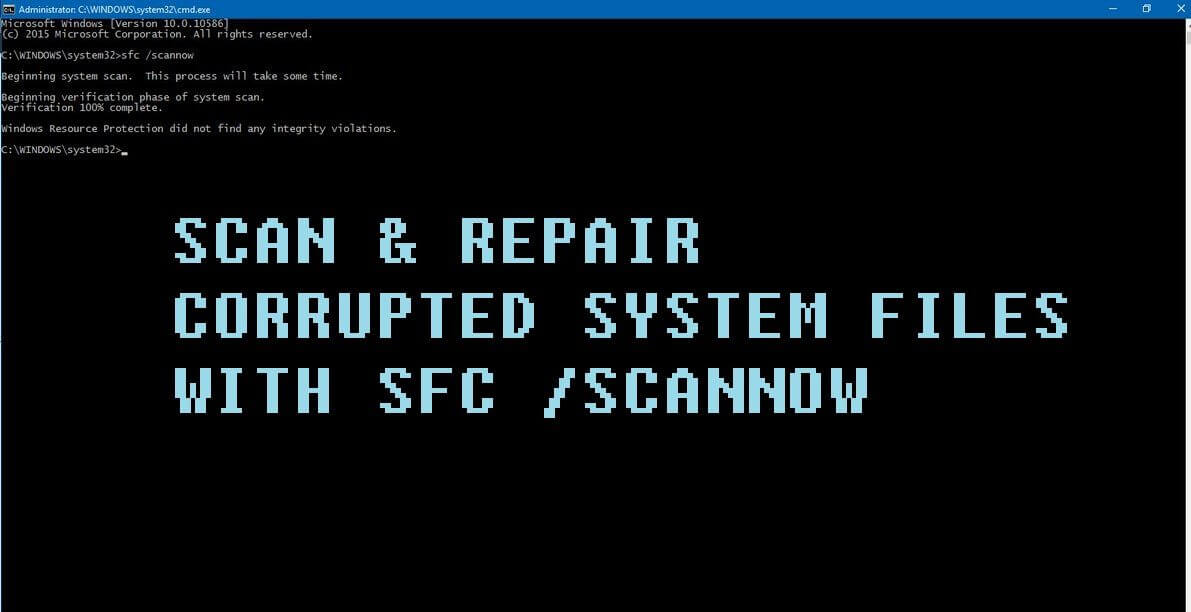
Step 2. Open command prompt, type ” sfc / scannow ” and press enter. After that, all protected files on the system will be scanned to see if there are any problems with the computer. The process takes a few minutes to complete;
Step 3. When the process is finished, the System File Checker will display one of the messages:
- “Windows Resource Protection did not find any integrity breaches”.In this case, there is no need to do anything, as there are no missing or corrupted system files on the computer;
- ”Windows Resource Protection found corrupted files and successfully repaired them.Details are included in the CBS.Log% WinDir% \ Logs \ CBS \ CBS.log folder.” In this situation, the user should not take any action, as the error has already been corrected by the System File Checker itself. However, it is recommended that the check be carried out again to check if the problem has really been solved;
- “Windows Resource Protection cannot perform the requested operation“. To perform the verification, the user must enter the computer’s safe mode;
- “Windows Resource Protection found corrupted files, but was unable to correct some of them.Details are included in the CBS.Log% WinDir% \ Logs \ CBS \ CBS.log folder.” In this case, the user must manually correct the error, replacing the corrupted file.
How to fix the problem in safe mode
Step 1. Click on computer’s settings and go to “Updates and Security”;
Step 2. Then click on the “Recovery” tab and find the “advanced boot” option. Select “restart now” and you will be redirected to your computer’s safe mode;
Step 3. Select “Troubleshooting”;
Step 4. Then click on “advanced options”;
Step 5. In the next window, click “command prompt” to open it offline. Select the user and provide your computer password to open the command;
Step 6. Open the command prompt, type “diskpart” and hit enter. Then type “list volume” and click enter. It will display all the computer’s breakdowns. Observe the one that occupies the most space, as this is where the system is usually stored;
Step 7. Type “exit” and hit enter to exit the diskpart. Then type “sfc / scannow / offbootdir = D: \ / offwindir = C: \ Windows” and press enter. In “offbootdir”, put the letter of your computer’s office where the system is stored. In the “offwinder”, add the letter of the division where the Windows files are;
Step 8. Close the command prompt and then click continue. Windows will start and correct any errors found in the scan.
How to fix errors manually
Step 1. Open command prompt, type “findstr / c:” [SR] “% windir% \ Logs \ CBS \ CBS.log>”% userprofile% \ Desktop \ sfclogs.txt “(without quotes) and press enter;
Step 2. Search for “sfclogs.txt” on your computer and open the editable file;
Step 3. All verification processes will be displayed. Search for the process that contains the message “cannot repair member file”. It is this file that must be replaced manually. Another file can be found on the Internet, however you need to be careful and download it from trusted sites;
Step 4. After finding the file and downloading it to your computer, open the command prompt as an administrator. Type “takeown / f Path_and_FileName” and hit enter. Enter the letter of the compartment in which the file is located and its name, for example: “takeown / f C: \ windows \ system32 \ jscript.dll”. After that, the problem will be solved.