
Discord is a rapidly growing text and voice chat application that is particularly aimed at gamers. The sleek and simple design makes it a great alternative to older apps like Teamspeak and Skype.
Create, Configure, and Manage Your Discord Server
Discord took a lot of inspiration from Teamspeak’s extensive customization and management options, but has dug some of those options into the user interface. Fortunately, it’s pretty easy to get started.
How do I create a Discord server?
Creating a Discord server is straightforward. First you need to either download Discord (Windows, Mac OS, Linux, iOS or Android) or open the Discord web interface. Either way, you’ll need to create a free user account to get started. So do everything first.
The first time you open Discord and sign in, you will be asked if you want to create or join a server. If you’ve used discord before and skipped this entry-level screen, you can create a new server by clicking the big plus in the Discord interface.
Click on the “Create Server” button to create a new server.
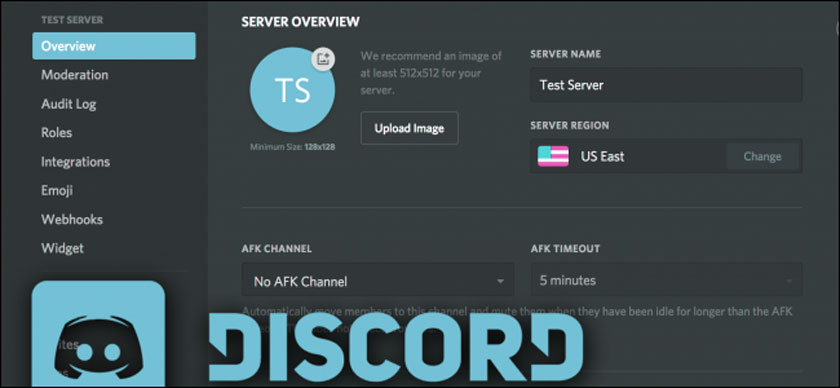
Give your server a name, choose a different region if your region was not recognized correctly, and then click the “Create” button.
Your new server has been created and you will be automatically connected to the server. On the left, select your new server and click the drop-down arrow next to its name for options to invite friends, change server settings, create channels, and more.
Set up user roles so that permissions can be managed more easily
Roles in Discord give users certain permissions. For example, you can create a role for moderators and give this role the ability to ban users and delete messages. All users you assign to this role inherit these permissions.
By using roles, you don’t have to assign permissions to every user. You can also use reels to do something as simple as giving your friends a cool rank and color.
To manage the roles, open the server settings and click on the “Roles” category on the left. You can add new roles by clicking the little plus icon next to the “Roles” title on the page. Select a role to manage permissions.
There is a long list of permissions, but the main ones relate to the ability to manage the server by creating new channels or roles, managing users by blocking or deleting messages, and moving users to voice chat.
There is also an administrator role that gives up all permissions, with the exception of server owner-specific ones (e.g. deleting the server).
The first setting – “Show role members separately” – shows people in this role in their own category in the Users panel. You can do some nice tricks by leaving this setting off for certain roles.
For example, if you have several admins but want to change your color, you can create a new role and set it via admin. However, leave this option unchecked so that no new category is created.
Here we have created a “Cool Color” role and assigned a color to it.
Now every user assigned to the “Cool Color” role is displayed in blue.
You can also use this trick with permissions. For example, you can use administrator privileges to set up a server administrator role and issue it selectively instead of distributing it to everyone.
When you have set up the roles you want, you can assign users to the roles by right-clicking their names and checking the appropriate box in the Roles menu.
If you have a particularly large server, you can use the Members tab in the Settings panel to search for people so you don’t have to scroll down the list for @.
How do I organize channels?
Each channel on your server is organized into categories. To create a new channel or category, right-click anywhere in the Channels window and click either the Create Channel or Create Category command.
When you create a channel, give it a name and choose whether it’s a text or voice channel. Channel names cannot contain spaces (entering a space creates a hyphen) or capital letters.
When you create a category, all you have to do is give it a name. Category names can contain spaces. While you can enter upper and lower case letters, they are always displayed in upper and lower case.
Channels also have their own channel-specific permissions that can be accessed by clicking the gear next to a channel. By default, these permissions are synchronized with the category the channel belongs to. However, if you change them, they will stay that way until you sync again.
You can also mark categories and channels as private. When you create a channel, simply select “Private Channel” and then enable the roles you want to access.
If you only want to add a few people to the channel, it is best to create a new role for this channel and then add users to this role.
Important Guidelines
With large Discord servers, you need to take some precautions when assigning roles and channels. For example, if you have created a private channel and a new role for this channel, but this role is under another role with the “Manage roles” option enabled, people in this role can assign themselves the new private role and access your channel. There are plenty of other cases like this too, so here are some guidelines to follow:
- All channel-specific roles should be above the highest administrative role.
- Custom color roles that are placed via admin give administrators the ability to create new administrators as they are technically higher than admin.
- With Manage Channels, users can also delete channels and delete all messages in the process. For this reason, you should probably not give this permission too much. The same applies to the administrator.
- In read-only channels, members can still add reactions with emoji. Since there is a whole alphabet of emoji, people can phrase things in response to your messages. You cannot delete them. So if you have a problem with people posting things they shouldn’t do, you can disable this ability under @everyone in the channel-specific settings. You can also hover over the reactions to see who put them there.
- If you have unwanted administrators, the audit options log will keep track of all administrative operations, such as deleting messages or blocking users. This will help you identify who is causing problems and remove them.
- If you have a problem with external spam, you can set the auto-mod level in the settings under “Moderation”. This requires new users to verify their email address or be an active Discord user before joining.
If you really need help moderating, there are a few bots you can add that will help. MEE6 is my personal favorite with its nice web dashboard and ranking system, and Dyno works well too. You can search other Discord bots on discordbots.org.