
Apply Thermal Paste on the Processor: If you are building a computer and need to install a cooling system on the processor, or when cleaning the computer when the cooler is removed, a thermal paste must be applied.
Despite the fact that the application of thermal paste is a fairly simple process, mistakes are often made. And these mistakes lead to insufficient cooling efficiency and sometimes to more serious consequences.
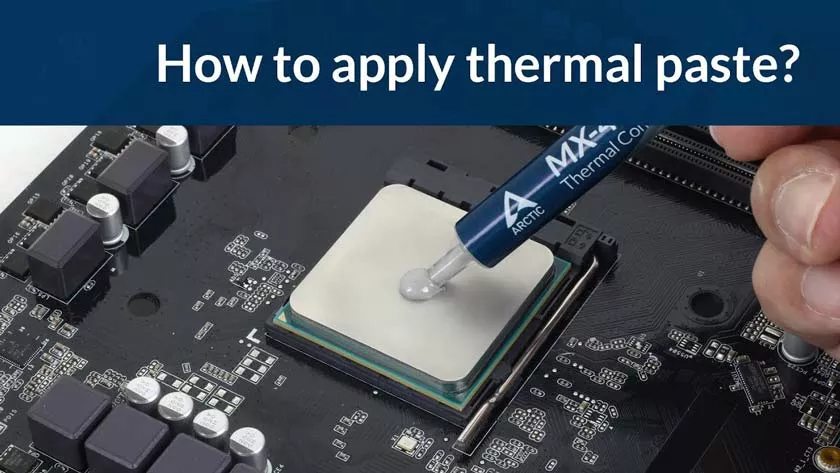
How to Apply Thermal Paste on the Processor
This guide will discuss how to properly apply thermal paste and will show the most common application errors. I will not understand how to remove the cooling system and how to put it in place – I hope you know it, and even if not, it usually does not cause difficulties (however, if you have any doubts, and, for example, remove the back cover of the phone from your phone is not always coming out – you better not take it).
Which thermal paste to choose?
First, I would not recommend the KPT-8 thermal paste, which you will find in almost any place where thermal paste is sold at all. This product has some advantages, for example, it almost “does not dry out”, but still today the market can offer several more advanced options than those released 40 years ago (yes, KPT-8 thermal paste is produced just as much).
On the packaging of many thermopaste you can see that they contain microparticles of silver, ceramics or carbon. This is not a purely marketing move. With proper application and subsequent installation of the radiator, these particles are able to greatly improve the thermal conductivity of the system.
The physical meaning of using them is that there is a particle between the surface of the sole of the radiator and the processor, say, silver and no compound paste – a large amount is found over the entire surface area of such metal compounds and this contributes to better heat recovery.
Of those present on the market, I would recommend the Arctic MX-4 (and other Arctic thermal pastes).
1. Cleaning the heat sink and processor from the old thermal paste
If you have removed the cooling system from the processor, it is necessary to remove the remnants of the old thermal paste from wherever you find it – from the processor itself and from the sole of the radiator. Use a cotton wipe or cotton swabs.
Very well, if you can get isopropyl alcohol and wet them with a wipe, then cleaning will be much more effective. Here I note that the surfaces of the radiator, that the processor is not smooth, but have a micro relief to increase the area of contact. Thus, careful removal of the old thermal paste, so that it does not remain in the microscopic furrows, may be important.
2. Place a drop of thermal paste in the center of the processor surface
It is the processor, not the radiator – it does not need to apply thermal paste at all. A simple explanation is why: the sole area of the heatsink is usually larger than the surface area of the processor, respectively, we do not need the protruding parts of the heat sink with the applied thermal paste, and may interfere (including, and close the contacts on the motherboard, if the thermal paste is too much).
3. Use a plastic card to distribute a very thin layer of thermal paste over the entire processor area
You can use a brush that comes with some thermal paste, just rubber gloves or something else. The easiest way, in my opinion, is to take the unnecessary plastic card. The paste should be spread evenly and in a very thin layer.
In general, this process of applying thermopaste ends.
It remains to carefully (and preferably from the first time) install the cooling system in place and connect the cooler to the power supply.
Immediately after turning on the computer, it is best to go into the BIOS and look at the temperature of the processor. In idle mode, it should be in the region of 40 degrees Celsius.