
For security or privacy reasons, you may want to completely mute the microphone on your PC. Or do you just want to cut the whistle for a few applications? In both cases, here’s how to do it.
Do you suspect thatyour computeris spying on you without your knowledge? If Microsoft has suffered many complaints about this on the release ofWindows 10, the Redmond company is now trying to get through the nails. During installation, the operating system asks you what access rights you grant it and it is of course possible to give it none.
But we are not immune to a small deviation or a bug on the part of the system. And that’s without counting amalicious programthat would have installed on your machine and that would spy on you with impunity. Unless the software in question has beendeliberately installed by someone you knowwho would like to know more about your activity?
Whatever the reasons for maintaining a certain level of confidentiality on your PC, you can start bydeactivating the microphone. It’s already a good way to preserve your privacy. So proceed as follows.
Disable the microphone in Windows 10 using the Settings module
- Click on theStartmenu and go to theSettings icon, symbolized by a toothed wheel.
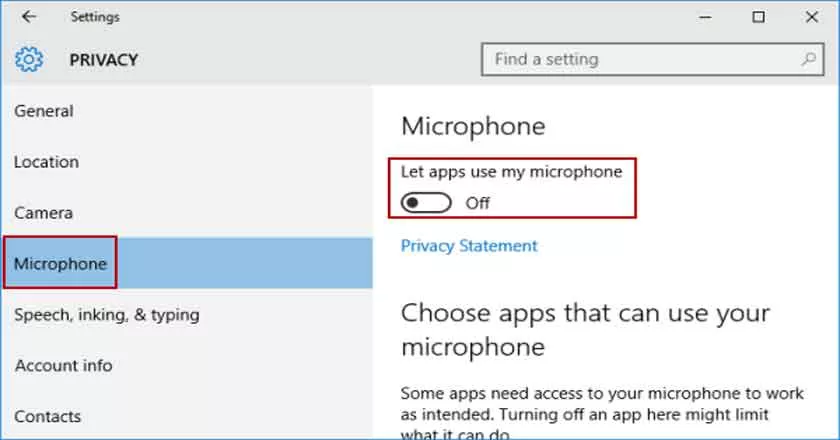
- Then select theConfidentiality function. In the left column, you should see an option calledMicrophone. Select it.
- If you want to permanently cut off access to your PC’s microphone, click theChange button. In the small window that appears, set the microphone access toDisabled. Here it is, done: the microphone is completely out of service.
- Rather than completely deactivating your PC’s microphone, it can also be wise to do it application by application. To do this, stay in theSettings>Confidentiality>Microphone module . A list of Microsoft Store apps appears. You will find Cortana, the Camera app, Skype, Xbox Game Bar, etc. You can activate or deactivate them one by one.
- Still in the same window, but a little lower this time. You should find a list of desktop applications that may use the microphone. There, you have no choice: you will have to either deactivate all the applications, or leave them all activated.