
Of all the tools available in Microsoft Office, Excel is the ideal tool for making budgets quickly and easily. Its column and row format allows us to add items and figures with great ease.
How to Make a Budget in Excel
In this article we are going to show you how you can make a budget using Excel and create a custom spreadsheet. This will help you control your income and keep track of your expenses, both at the company level and at the personal level.
To start creating the budget, we must first select the types of income and expenses that you will assign to the spreadsheet.
You can organize yourself by placing the income above and the expenses below, you can also group those that belong to the same category. To create a simple budget file in Excel, follow each of the steps listed below:
List of 10 steps to prepare your own budget in Excel
1. Launch the Excel application and open a blank spreadsheet.
2. Click on cell “A1” and type a title for your budget. For example: Family budget.
3. Click on cell “A3” to write “Items” you can also call it “Items” or simply “Description”.
4. In the next column, in cell “B3” write the word “Income”
5. Click on cell “C3” and enter the word “Expenses”. At the end of this point you will have the headers of your budget ready.
6. To insert the content of the items, you must click on cell “A4”. List the income and expenses by placing one line item for each row on the page in column “A”. The description should be summarized so that the entire sentence can be appreciated.
The figures associated with each of the items are placed in columns “B” and “C” depending on whether they are income or expenses. Do not put the expenses with a negative sign since they will be totaled with the income with a formula at the end.
7. Once you finish filling in the list of items, we will add all the income for the period. To do this, you will need to click on the cell in column “B” that is directly below the last amount you entered. This in order to apply a formula that allows us to add all the values found in the column corresponding to income.
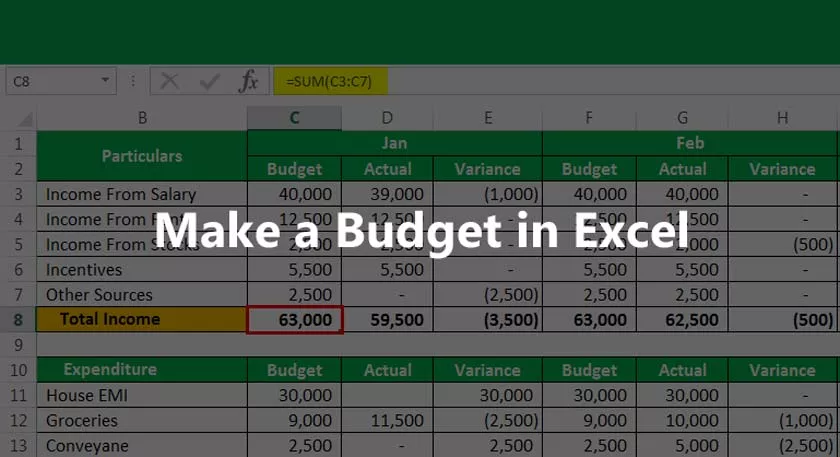
8. In the cell that we clicked on in the previous step, write the following formula: “=SUM(“. You must select all the amounts in column “B” by shading the cells with the left mouse button. button pressed to shade the cells by clicking on the first one from top to bottom and moving the mouse.
Finally, close the parenthesis of the formula and you will click on the “Enter” or “Enter” key depending on your keyboard. As a result you will have the sum of the income of the established period.
9. In the same way that we obtained the sum of the income, we can calculate the sum of all the expenses. Type the formula “=SUM(“ into the cell in column “C” that is just below the last value you entered in the expense column. You are going to select all the amounts in column “C”.
Finally, Close the parentheses of the formula and you will press the “Enter” or “Enter” key depending on your keyboard, as a result you will obtain the sum of all the expenses of the established period.
10. Once we have both sums, we move to column “D” to subtract the income and expenses. Click on the cell in column D that is next to the cell in column “C” where we had added the expenses. Type the sign “=” and then click on the total income in column “B”.
Type a minus sign and click on the total expenses in column “C”. Click the “enter” key and the result of the subtraction will be displayed.
Additional information
By applying these steps, you will already have a template with which you can make your budget quickly and easily. You will have positive or negative numbers that will depend on the formula.
If the final number is not what you expected, check the budget lines. See where you can make changes to both your income and expenses to adjust this value.
It may happen that you have missed some item to include in your budget. However, that has a solution without having to make major changes.
To insert new rows into the spreadsheet, simply click on the row numbers on the left side of the spreadsheet to select the entire row. You’ll know you did it correctly because both the row number and all the column letters will be shaded.
Click the right mouse button and select the “insert” option. A new row will be displayed immediately where you can add the information of the game, likewise, the cell will automatically calculate the new difference.
Excel also allows you to customize your budget sheet to make it look even better. You can adjust the width of the columns so that the descriptions are fully visible. Place the cursor between two columns and move it left or right to adjust the spaces.
You can also set the cells to display decimals by changing to the “number” format on the home tab. This small modification will make the values more precise and detailed.
By applying each of these steps and customizing your budget sheet, you will be able to record and control your finances. It will also serve as a work tool, especially if you are responsible for some petty cash and have to prepare reports.
You must make sure to save the file after you have completed the steps and each time you make any updates. Otherwise you can lose any advance you have had.