
There is no doubt that a memory card or SD card is one of the best and practical options for storing important data. Memory cards are used to expand the storage of mobile devices and tablets.
Although Android smartphones currently provide sufficient space for users to store data, the use of memory cards has not subsided.
Maybe you need extra storage to store long videos, or maybe you need to save high-resolution photos. Whatever the reason, the memory Card can not be used to store application and game files.
Android generally installs the Apk file on internal memory and stores data on a memory card. That means, when installing an application or game, Android uses internal and external memory. However, there’s no need to bother anymore if internal storage is too narrow to store all the data you need on Android.
You can make a memory card as Android internal storage. How to do this depends on what version of Android you are using. Here’s how to make a memory card as an internal storage on Android
How to use the SD Card as Internal Storage
Android Marshmallow introduces changes to the way mobile phones can handle memory cards, and these changes continue to the next version of Android. You can now set the microSD card to function as internal storage.
Instead of having existing internal and external storage as separate spaces, Android views the card as an extension of the memory installed in it.
You must set it first. Your card will be erased in the process, so make sure you have backed up the data you need. Here’s how:
1. Insert the card in the slot. When the New SD Card notification appears, tap Set Up.
2. Next, you have to choose how the phone uses the card. Select Phone Storage on Android 9, or “Use as Internal Storage” l on the older version.
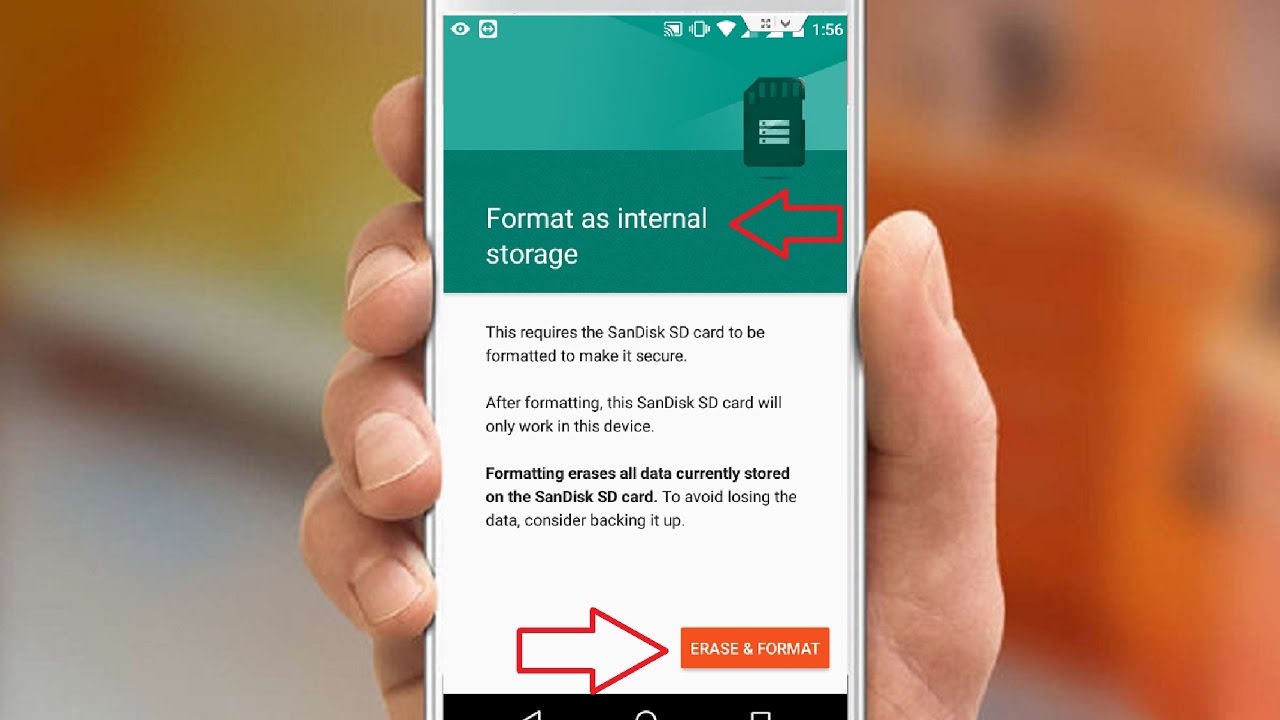
3. Or, go to Settings> Storage, tap the card, tap the menu button, and select Storage Settings. Tap Format as internal.
4. On the next screen, tap Format SD Card, or Erase & Format. This will format the memory card.
5. On Android 9, Android offers the opportunity to move content – including applications – to the card. It also shows how much space will be saved. Press Move Content to finish.
This feature is called Adoptable Storage, and requires you to permanently store a memory card on your mobile. This card is also encrypted, so you can’t enter it to another device to copy data.
The big disadvantage to storage that can be adopted is that some manufacturers prefer not to offer it on their devices. If you don’t have it, then you have to keep moving the application to the SD card manually.
How to Move Applications to the SD Card on Android 9.0 Pie and Android 8.0 Oreo
If your phone doesn’t support Adoptable Storage, you need to transfer the application to the SD card on Android Pie manually. Here are the steps:
1. Go to Settings > Apps & notifications > App info.
2. Find the application you want to move in the list and tap.
3. Select Storage. If the application supports being moved to a card, you will see a button here labeled Change or Change. Tap the button.
4. Select SD Card in the Change dialog box. This displays a confirmation screen. Tap Move to start.
To move the application back to internal storage, repeat the steps above but select Internal shared storage in the last step. You should always do this when you want to change or remove a memory card.
How to Move Apps to the SD Card on Android 7.0 Nougat and Android 6.0 Marshmallow
You can move applications to the memory card on Android 7.0 Nougat through Settings. However, you cannot move all applications, and if you do not support them, you will not see the Change button in Step 3.
1. Go to Settings > Apps.
2. Find the application you want to move to the microSD Card and tap on it.
3. Open Storage> Change and select your card from the prompt box that opens.
4. Tap Move to finish the process.
Depending on the size of the application, it might take a while to finish (especially for large games), so don’t touch the phone until it’s finished. To move the application again, repeat the steps and select Internal shared storage in Step 3.
How to Move Apps to the SD Card on Android 5.0 Lollipop
Lollipop has less powerful support for memory cards than newer versions of Android, but you can still move applications from within Settings. This setting is limited depending on the developer who supports the option. In addition, all applications also do not move to the card.
1. Open PC Settings> Apps and tap the application that you want to move to the SD card.
2. Next, under the Storage section, tap Move to SD Card. The button will be gray when the application is moving.
3. If there is no Move to SD Card option, the application cannot be moved.
After completion, the Storage section will update to show how many applications are now stored on the card (and how much is still in internal storage). The Move button will now read Move to Phone or Move to Device Storage. Tapping on this allows you to delete the application from the card.
How to Move Apps to the SD Card on Android 4.x and Earlier
Support for microSD cards is very limited in all versions of Android 4.x (including KitKat, Jelly Bean, and Ice Cream Sandwich). Stock Android does not support the ability to move applications to an external card at all, because Google seems to intend to delete the card completely.
However, some manufacturers choose to include these features in their own versions of the operating system.
1. Go to Settings > Apps.
2. Next, find and tap the application you want to move to the card.
3. Select Move to SD card. If this button is not available, you cannot move the application (or your mobile does not support it).