
TheDualShock 4fromSonyis a great controller that can beused on PC if necessary. If you own anold DS4you may have noticed that the controller is not holding the charge as it once did.
When we get to this point, many choose to buy a new one. Of course the DualShock is not the most expensive gamepad on the market, but it is not even so cheap at the price of € 60.
Unless the DS4 has other problems, it doesn’t make much sense to buy a new one whenreplacing the battery is a cheap and simple solution. In this guide, we will show you how to save over 70% of the cost of the new controller by simply replacing the battery.
What you will need
The only tools needed for this repair are a Phillips # 00 screwdriver and a tool to force the controller to open sideways. You may already have a screwdriver, but if not, you can find one for around € 3 on Amazon. Of course you will also need a3.7 V battery.
There are 2 types depending on the model number of your DualShock4. While the battery type is the same, the connectors are different, so be sure to buy the right one. For the model of theCUH-ZCT1E or CUH-ZCT1U controller, the large connector type is required.
Units listed asCUH-ZCT2 or CUH-ZCT2Uhave the smallest plug. The model number isprinted on the sticker on the back of the control.
Generally, you can find batteries for around € 15. The standard DS4 batteries are 1000 mAh. Most generic batteries on the market have higher capacities.
Before starting
The buttons and springs for theL2 and R2 triggershave a tendency to fall, especially R2. Springs are small and can be difficult to find, so be careful.
When you lever the controller sideways, you will hear loud sounds for opening, do not be alarmed it is almost impossible that the body will break. With all the preparation work done, replacing the DualShock 4 battery requires five simple steps, so let’s get started.
How to Change the DualShock 4 Battery
1:Remove the four screws on the back of the DualShock. They are quite small, so position them somewhere so as not to lose them.
2:With the front of the controller facing us, we press on both sides of the left handle levering between the inlet connecting the two parts of the controller. It takes a little pressure if the controller has never been taken apart before.
3:Use the thumb of the other hand to hold the slot open while moving the spudger upward in the direction of the left analog stick. Continue to pry and use your thumb to keep the gap widening. This process requires a fair amount of pressure.
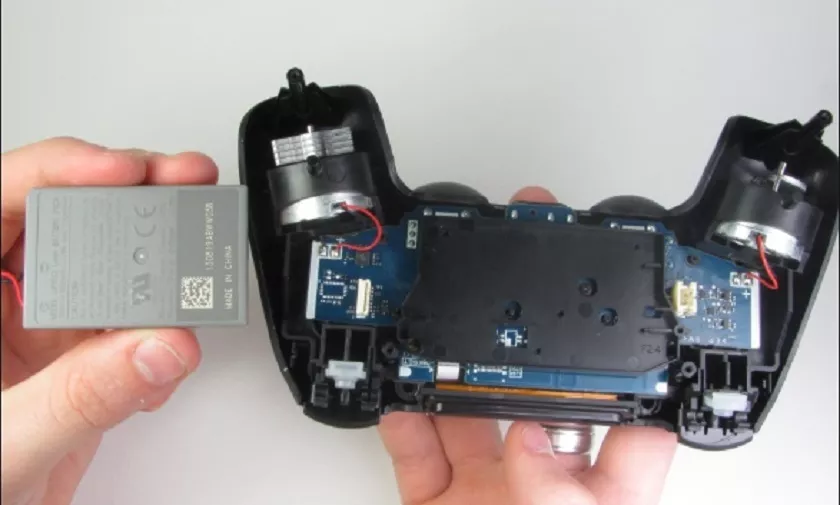
4:Once the top and bottom halves of the DualShock have released, you can easily separate them. Be careful as there is aribbon cable that connects the two halvesthat go from the light bar to the circuit.
To simplify things, disconnect the ribbon cable by pulling it straight up and away from the motherboard (PCB). Remember the orientation of the connection so you can reinsert it the same way it came out.
5:Disconnect the old battery bygrasping the sides of the connector and swinging it back and forth while pulling. Connect the new battery, making sure it is fully seated in the compartment and then perform steps 1 through 4 in reverse order.
Our replacement batteries have been shipped fully charged, but this may not always be the case. If the controller doesn’t seem to work, connect it first via the USB charging cable without taking everything apart again. If the light bar turns on and you can control the console while it is connected, the battery will only need to be charged.