
Looking for how to create a LinkedIn Company Page? Nowadays, it is not only important for professionals to have a presence in this social network with their own profile, but it is also important for businesses and companies, through a professional page, which represent a space dedicated to sharing content from corporate character value.
And it is that LinkedIn has become the best-known professional interaction platform in the world and, at the same time, one of the social networks that has obtained the highest growth in recent years in Spain and Latin America.
Therefore, if you have your own business, regardless of whether it is small, medium or large and you would like to start taking advantage of the benefits it offers you in terms of synergies with other companies, Networking and Online visibility, I have prepared a tutorial for you. Learn how to create a LinkedIn Company Page step by step.
Previous considerations before creating a corporate page on LinkedIn
Before starting, you should bear in mind that, although I have tried to make this article as practical as possible, (and in fact, you will see that it is) I would like to clarify some theoretical aspects that are important for us to understand this:
Do not confuse page with profile (professional)
When I speak of “company page”, I mean a LinkedIn account with the type of “corporate page” and not a “professional profile”, despite the fact that many users, albeit erroneously, mention these spaces within this social network as a company profile on LinkedIn.
And as an example, I’ll show you what both currently look like:
Professional profile
Company page
You must first have your own profile
In order to create a company page you must have a presence on this social network. Otherwise, it will not be possible for you to have your own corporate space for your business.
It is the same that happens whencreating a page on Facebookfor companies, that you must first create a personal profile.
In addition, if you want to manage it and you were not the creator of it, you must have the appropriate authorization, since your profile will be used for editing and managing said page, turning it into an administrator role.
How to Create a LinkedIn Company Page?
Now, let’s start with the guide you are here for, to know how to Create a LinkedIn Company Page. You just have to follow these simple steps:
1) Enter your LinkedIn profile
The first thing you need to do is enter your profile, since as I just told you, you must create a page from a profile.
To do this, log in fromlinkedin.comand you will go to the feed with the latest publications of all your current contacts ( https://www.linkedin.com/feed/ )
2) Access the products section and go to “Company Pages”
Once you are at home, go to the top right of the screen, right next to your profile picture you will find an option that says “Products”. Click there and a small vertical menu will pop up.
In the products menu, scroll to the bottom and you will find an option that says “Company Pages” accompanied by a ” + ” sign.
Click on it to begin the creation process.
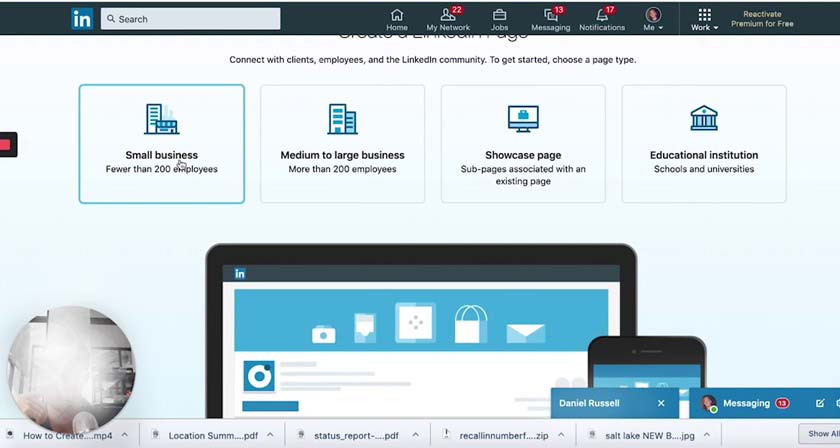
3) Select the type of company or business you run
Once you get to this point, the platform will ask you to select the type of business you run and for which you want to create the page. You will have the opportunity to choose between 4 different options.
Each of these types of page has its own characteristics, and adapts to your needs. The options are:
Small business
A type of page specially designed for those companies that have fewer than 200 employees .
If this is your case, you must choose this one.
Medium-large company
For medium and large companies, here you can create one adapted for companies with more than 200 employees .
Products page
Unlike the previous two cases, this particular type is designed for those people who want to create a specific one for a product or service, but who continue to maintain a connection with the main company on the platform.
You first need to have a home page created in advance.
Educational institution
As the name implies, this type of page is designed for any company that is dedicated to education, including universities.
If your sector is education, this is the right type.
4) Fill in the basic information of your profile
Once you have selected the type of company you own, you will enter another section, in which LinkedIn will ask you to add the basic information about your business.
In itself, it is not complicated to do, you only need to add some other basic information regarding your Brand.
Furthermore, on the right of the screen you will find a preview in which you can see how the appearance of your corporate page is looking.
The information that you must fill in can be divided into 3 parts, and consists of the following:
First part: identity of the page
In this first section you must include the information that identifies your company, that is:
- Company name.
- The public URL you will use for LinkedIn (it does not necessarily have to include the name of this, but it is generally what is usually used).
- Official page of the company, in this case it would be the main Web domain of your business. If you don’t have one yet, don’t worry, you can add a website later.
Part two: company details
In this second section you should include some additional details, mainly related to the sector and its size.
- Sector to which it belongs.
- Size of the company; Here you must choose an approximate number, between 0 and 200 employees.
- Type of business, whether autonomous, public or non-profit, among others.
Part three: profile details
Finally, the third part is quite simple. In it you must include your corporate logo and a slogan.
- For the logo, it is recommended that it be a good quality image, square and about 300 pixels , and the supported formats are JPG, JPEG and PNG. If you don’t have one yet, don’t worry, you can add it later.
- With the slogan there will not be many difficulties, you can for example use a slogan of your company, or a phrase with which it identifies.
Remember that as you fill in the information, the preview will update automatically, so you can check how it looks at any time.
Now to finish, just check the checkbox at the end where you agree to have the authorization to create the company page, then just click on “Create page” and that’s it.
!! Congratulations!! You have already created your company page, now you just need to adjust some details.
5) Complete the page profile
The last thing left to do is complete your company profile.
Once you’ve clicked “Create Page”, LinkedIn will automatically redirect you to your company’s profile with admin access. You will see a screen similar to this:
Now, the important thing here is the box that I have marked in red.
There you will find some “tasks” that you will have to do to fully complete your profile. The tasks that you must perform are 7, (6 if you have already added your company logo before):
Site URL
If you haven’t added your site URL yet, this is the first task you will have to do.
You can add your own site or, if you don’t have your own, you can simply click on the option that says “I don’t have .
In case you later have a website for your company, you can easily add it from your profile settings at any time, so it is not a final choice.
Description
In this part you will have to add a description of your company.
You can write anything, in a way it is like the “biography” of the corporate profile . A good idea is to write what you and your team do and what your mission, vision and fundamental values are.
The description is limited to about 2000 characters.
Logo
The next step is to simply add the logo, so if you haven’t uploaded it before, you can do it from here.
Location
The next thing will be to add a location for your company, as well as a postal address, although if you don’t have it, don’t worry, you can omit it.
The important thing is to add the country, city and province in which the company is registered, as well as the postal code.
Of course, in case you do not have a postal address, remember to check the box that says ” My company does not have a postal address ” that I show you below:
Custom button
Another necessary task to complete your profile 100% is to add a custom button, which you can use as a call to action (CTA) so that users who visit your profile can click on it.
It is quite easy, and you can choose different buttons:
Note that no matter which button you choose, you will have to add a URL that will be where your custom button points.
This is perfect to send them to your website or to some contact method.
The button will be displayed just below your profile photo and the name of the page, next to the option ” + Follow “, so it will be one of the first things your visitors will see.
Your first publication
There is not much to explain, since this task consists of precisely that, to make your first publication as a company page.
It will be basically like in any other social network, adding the text, emojis if you prefer and a URL, in case you want to share an article from your company’s blog; Although it could also be an infographic, video or another type of representative element with which to interact with your community (the one you are getting from now on).
Add hashtags
Finally, the last task you will have to do is to include hashtags.
LinkedIn, for a few months, has allowed you to add up to a maximum of 3 hashtags , so you have to choose well those that best identify with your company.
Others
Now, there are a few little things to add. Apart from the information that you have included when completing the main tasks that I have mentioned, there are other data that you can add to make your profile even more complete.
It is precisely among this information that the company’s telephone number should be highlighted.
To include the telephone number of your company, you only have to access the editing area of the profile, and look for the “Summary” section, which is where you also find the description and the URL of your company.
Once there, go to the end, and you will find a field to include the phone number of your company , as well as another where you can add the year in which the company was founded.
Another important piece of information that you can find in the same “Summary” section is the specialties, which are basically those activities, services or products in which your company stands out. You can add up to a maximum of 20 specialties , which can be modified at any time .
Conclusion
As you have seen through these simple instructions, Create a LinkedIn Company Page for your business is very easy and will only take a few minutes.
I recommend that you take a complete walk through the edit menu, since this way you can complete the profile even more.
Remember that the more information you offer in your company profile, the easier it will be for other people to find your Brand, both your employees and your colleagues and collaborators, as well as potential clients, of course.