
Change DNS on Smart TV: Surely many have heard of DNSmultiple times without knowing what it was about. The abbreviation DNS stands forDomain Name Service and in essence is the service that associates numeric IP addresses with the names that we know of the sites and that we type on Google.
It works like a sort ofphone book, but of websites, which associates the name of the corresponding site with each number.
In many cases it is useful tochange the DNS to make certain applications work better, especially those of video streaming. Obviously it can be useful to change DNS on Smart TV, now become one of the main tools for enjoying videos.
Change DNS on Smart TV
TheDNS modificationprocedureis not univocal on eachTVmodel, but it can vary according to the manufacturer and therefore to the type of system installed. In this guide we will try to explain the general procedure that is fine for most TVs.
Change DNS for Wi-Fi connections
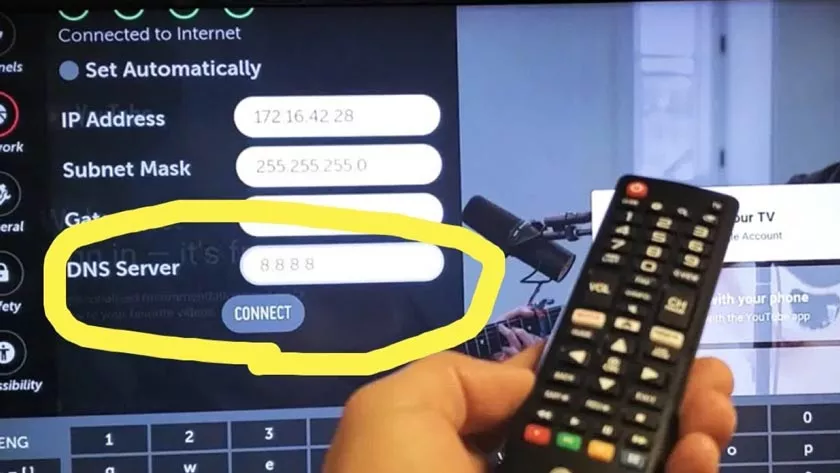
If yourSmart TV is connected via Wi-Fi, changing the DNS is very simple. You will have to enter thesettingsof your TV and goto the Network options, which can also be called Wi-Fi,InternetorWireless.
In this menu you will have to enterAdvanced Wi-Fi Settingsand disableautomatic registration settings or in general search for a manualconnectionconfiguration item.
From this menu you will find the various items related to the connection, such as the IP address and precisely theDNS Server, along with other network settings.
At this point the only thing left is toset up your DNS serverby typing the address in the appropriate field and saving the settings. At this point, just restart the TV to have the new network settings active with your DNS.
Change DNS for cable connections
Connecting the Smart TV, or any device, viaEthernet cablemeans having amore stable and faster connection, which is great for video streaming, especially real-time streaming.
The change ofDNSfor Ethernet cable connections is up and down the same as for Wi-Fi connection. You will have to enter theNetwork or Internetsettingsand disable theautomatic connection settingsor look for the item that allowsManual settings.
On this page you will have to enter the address of theDNS Serveryou want and save the settings. Once the TV has restarted the changes will be applied and you will navigate using the new DNS.
Change DNS from the modem/router
If you cannot change the DNS directly from the Smart TV, you can act from thesettings of your home modem router, in this case the settings will be active for all connected devices, and not only for the Smart TV.
To change the DNS from the modem router you will have to enter itssettings bytyping one of thesethree IP addressesin the top bar of your web browser:
- 192.168.0.1
- 192.168.1.1
- 192.168.1.254
Probably one of these three addresses will let you enter the settings of your modem router, ifnot, you will have to manually find out the IP addressof your router by consulting our dedicated guide.
Once you enter the personal area of your modem router, go to the connection settings, you will probably have to click onAdvancedand look for theDNS section.
Probably theAutomatic DNSitem or something like that will be checked, you will have todisable itand set up your DNS server. Once the changes are applied, it will take a few seconds for them to take effect.
Unfortunately, some manager modems do not allow you to change the DNS settings. In this case the only way is tobuy a personal routerthat takes care of the WiFi connection in the house, connecting it to the manager’s modem useful only for connecting to the network. Make sure you buy a quality router that allows you to have a fast and stable connection.